Written by Kurya on June 7th, 2024 Last Updated July 4th, 2024
A guide on how to create new models to be used in mods for Istaria.
Disclaimer: Due to the following software technically falling under the abandonware terminology, links are provided, however, I cannot guarantee these links will always remain functional because corporations gonna corporation.
In this guide I will explain how to:
-Install Alias Maya 6.0.1 (and break its no-longer-functional licensing)
-Install the Granny plugin to export .gr2 files
-Export .gr2 files
-Create a basic creature replacement with completely new assets
I will not be explaining how to use Alias Maya, if you’re familiar with Autodesk Maya it’s not too dissimilar, just missing some options (or some having different names), and if you’re familiar with 3d modelling software it shouldn’t be too hard to pick up, if you’re unfamiliar with 3d modelling software as a whole I would encourage you to learn about it in less archaic software first.
Resources:
-Maya 6.0.1 - Found on Archive.org (I personally use this specific one)
-Granny plugin for Maya 6 - Found on the Heroes of Might & Magic 5 Fandom. (MEGA link to the exact plugin)
Installing Maya:
-Extract Alias_Maya_Unlimited_v6.0.1.rar.-Run myr_maya601_win.exe and install the complete edition of 6.0.1 to a folder of your choice.
-Create flexlm folder on C drive
-Run Keygen.exe in the keygen folder.
-Select flexlm folder on C drive when prompted
-There will now be an aw.dat file in the flexlm folder
-Run Maya 6.0.1
-If it asks for a key, feed it the aw.dat file. (I did not have to do this)
Installing the plugin:
EITHER
-Grab the 3ds Max and Maya Plugins.rar from the Heroes5 fandom link. (second link on the page, first link is dead)
-Open it and go to: 3ds Max and Maya Plugins\Export_Granny\Maya6
OR
-Download the plugin directly through the MEGA link at the top of this document.
-Take the granny_maya6_0.mll and place it in bin\plug-ins of your maya 6 install. NOTE: do not put it in the plugins folder, use the plug-ins folder, hyphenated, maya has both for some reason.
-Start up Maya 6
-Go to window->settings/preferences/plug-ins manager.
-in the plugin managed you should have granny_maya6_0.mll, set it to load and auto load.
Congrats, you can now export models from maya 6 to Istaria!
Exporting .gr2 files
Istaria cuts its .gr2 files into 3 pieces:
-The mesh (sometimes multiple parts if it’s interchangeable)
-The skeleton
-The animations
So to make a custom creature, we’ll have to do exactly that. Once you have your creature fully rigged, (as well as potential animations made):
Mesh
-Select file->export all\
-For fiilename, put in whatever you wish.
-For filetype, select "Granny (".")"
-Select (click) Animations and uncheck the first two boxes (“Include reference in export” and “Include data in export”, always uncheck the second first, it’ll be greyed out if you uncheck reference first), double click Animations and make sure that in this new view, the first two boxes are also unchecked for every entry. Hit back in the top left.
 -Do the same for: Materials, Models & Textures.
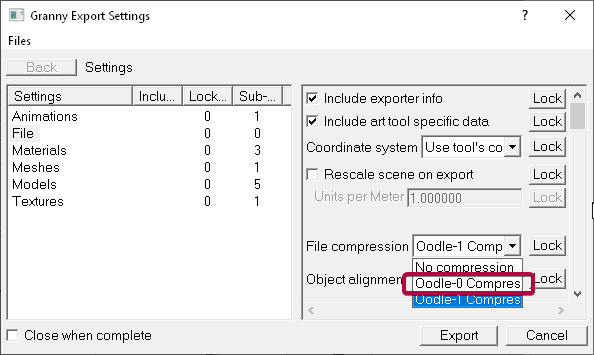
-Select File, and under file compression select Oodle-0 Compression.
 -For Meshes, make sure the first 2 boxes are checked, leave everything on default.
-Double click Meshes, it will now open another view that will show all your mesh shapes in the current scene, make sure that the mesh that you wish the export has the first 2 boxes checked. Make sure to uncheck any meshes you do NOT wish to export.
-Hit export, it will complain about Oodle-0, just ignore it and continue.
Once it is finished close the window (or select close when complete in the bottom left beforehand). The .gr2 file should be in your selected save folder and you can double check if it exported the mesh with Granny Viewer (link not provided).
Skeleton
-Select file->export all
-For fiilename, put in whatever you wish.
-For filetype, select "Granny (".")"
-As we did with mesh, uncheck the first two boxes for: Animations, Materials, Meshes & Textures. (Important: also make sure nothing is checked inside these)
-In File, select Oodle-0 Compression.
-For Models, make sure the first two checkboxes are checked.
-Double click Models, in this sub menu there should be: the 3 cameras (named: front, persp & side) as well as your root bone. Make sure the cameras have the first two boxes unchecked, and make sure your root bone has the first two boxes checked.
-Double click your root bone, make sure all the bones in the skeleton are checked to be included.
-Hit export.
Once the export finishes you can once again check if it exported correctly by loading it into Granny Viewer.
Animations
-For fiilename, put in whatever you wish.
-For filetype, select "Granny (".")"
-As we did before, uncheck the first two boxes for: Materials, Meshes, Models & Textures. (Important: also make sure nothing is checked inside these)
-In File, select Oodle-0 Compression.
-For Animations, make sure the first two boxes are checked.
-Double click Animations, the sub-menu that opens should show a file path for your current scene, double click the filepath and within this sub-sub menu make sure that only your root bone has the first two boxes checked, all other items should have everything unchecked.
-Double click your root bone, like with skeleton exports make sure all your bones are included.
-Hit export
Once the export finishes, you can drag your mesh, your skeleton, and your animation .gr2 into granny viewer and it should be available for viewing!